
In this guide
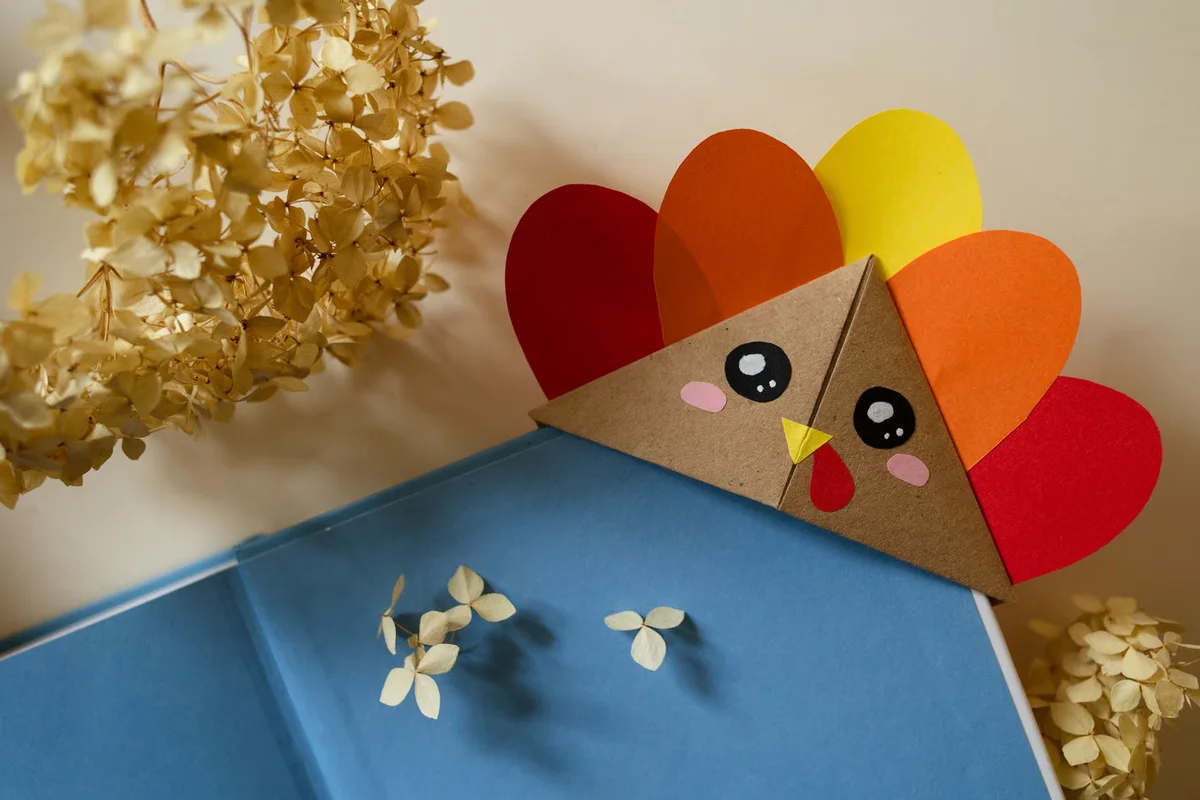
A folded pocket makes the page marker; the extra turkey pieces are a decoration. Begin with the plain pocket below before choosing a finish.
An origami corner bookmark is a folded paper pocket that slips over a page corner. Start with one square, make a triangle, mark two side folds, then fold only the front point down. The side tips tuck into that opening to hold the shape together. There is no glue or cutting in the folding sequence once your square is ready.
The tricky part is finding the correct layer. The top of the first triangle has two sheets sitting together; folding both downward removes the rear support you need. The guide separates that action from the two tucks and shows the opening close up.
The completed shape is a small square held like a diamond. Once it sits on a page, its visible front becomes a triangular cap. Those are two views of the same pocket, rather than two different bookmark patterns.
Choose a square and a book
Use one square of thin, creaseable paper. Origami paper with a colored face and a pale reverse makes it easier to distinguish the layers. Plain printer paper can also be folded for practice. Avoid starting with stiff card: several small folds stack at the tucked tips.
A 15 x 15 cm square gives you space to see what the corners are doing. It makes a fairly large cap, so a smaller square may suit your book better once you know the fold. The table gives the flat geometric size of the finished square, before allowing for paper thickness; it is not a physical fit test.
| Starting square | Flat finished square |
|---|---|
| 15 x 15 cm | 7.5 x 7.5 cm |
| 12 x 12 cm | 6 x 6 cm |
| 10 x 10 cm | 5 x 5 cm |
Check the shape of your starting sheet. Bring two adjacent edges together at a corner: a rectangle or a crooked cut will carry that mismatch into the flaps. If you need to make a square from a larger sheet, use a ruler and scissors before beginning. No template needs to be printed.
Have a clean, flat working surface and a spare sheet for practice. Use your fingertips to settle the creases; a sharp tool is unnecessary. Keep the pen or colored pencils aside until the folded pocket fits.
Fold the corner pocket
The cream face is the reverse of the green face. Keep the long folded edge toward you until the page-fitting step. Solid lines are paper edges; dashed lines are guide creases or a movement hidden inside the pocket. Curved arrows show the direction to move a flap.
Step 1 of 14
Put the reverse face upward
Start with a square and point one corner toward you. The cream face is upward here; green is the other face. Keep the sheet flat.
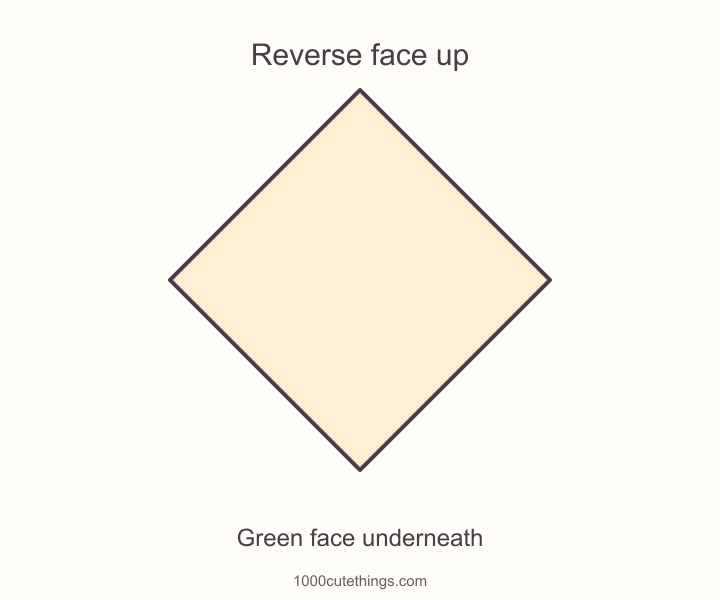
Step 1: Put the reverse face upward. Start with a square and point one corner toward you. The cream face is upward here; green is the other face. Keep the sheet flat.
Step 2 of 14
Fold the bottom corner to the top
Bring the point nearest you to the far point. Align those corners, then press along the long bottom fold. The green face is now visible.
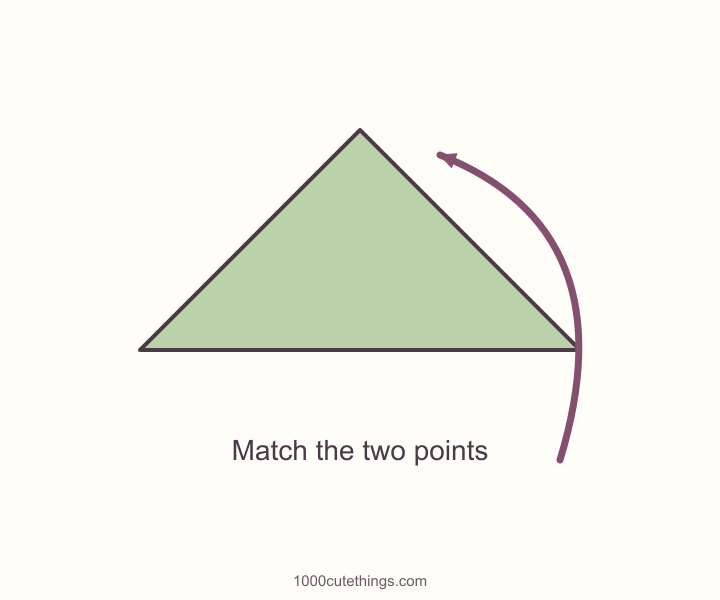
Step 2: Fold the bottom corner to the top. Bring the point nearest you to the far point. Align those corners, then press along the long bottom fold. The green face is now visible.
Step 3 of 14
Make the left guide fold
Bring the left point up to the top point. Press the sloping fold from the left edge midpoint to the middle of the long bottom edge.
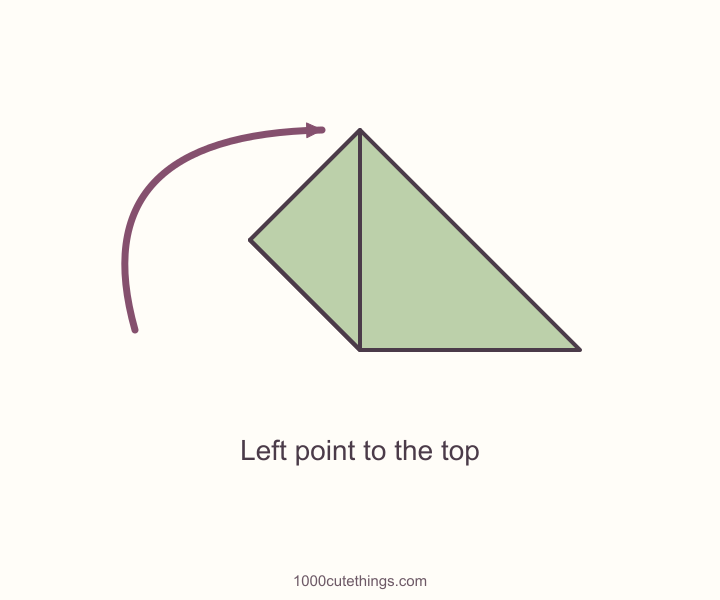
Step 3: Make the left guide fold. Bring the left point up to the top point. Press the sloping fold from the left edge midpoint to the middle of the long bottom edge.
Step 4 of 14
Make the right guide fold
Bring the right point up to that same top point. The two flaps meet down the middle, forming a smaller square held like a diamond.
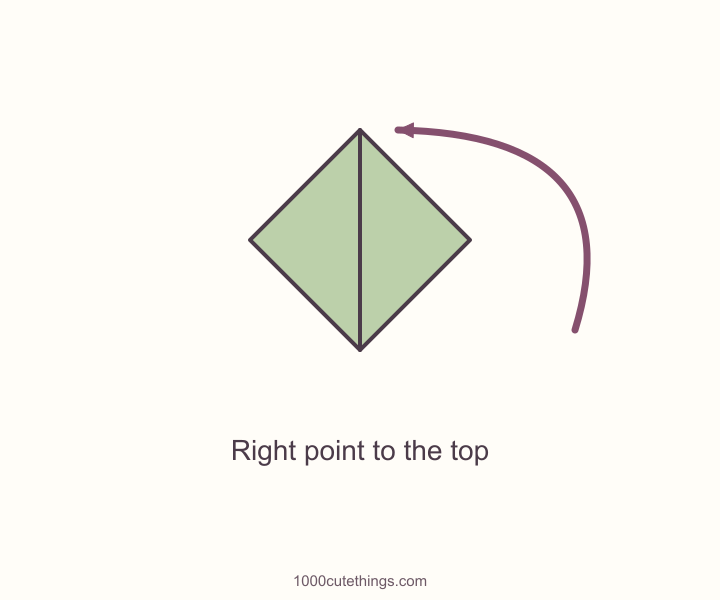
Step 4: Make the right guide fold. Bring the right point up to that same top point. The two flaps meet down the middle, forming a smaller square held like a diamond.
Step 5 of 14
Open the right guide fold
Return the right flap to its original side point. Keep the first diagonal fold closed and leave the new sloping crease in place.
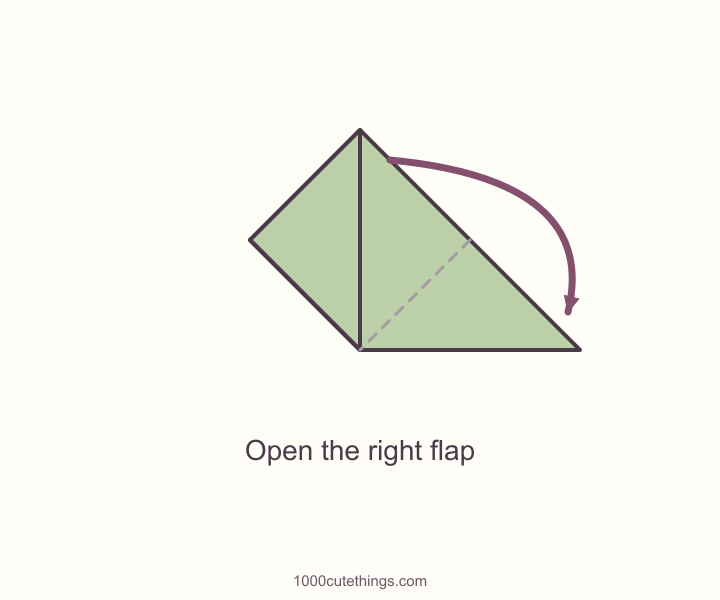
Step 5: Open the right guide fold. Return the right flap to its original side point. Keep the first diagonal fold closed and leave the new sloping crease in place.
Step 6 of 14
Open the left guide fold
Open the left flap too. You have the broad triangle again, with two sloping guide creases. Do not unfold the long bottom edge.
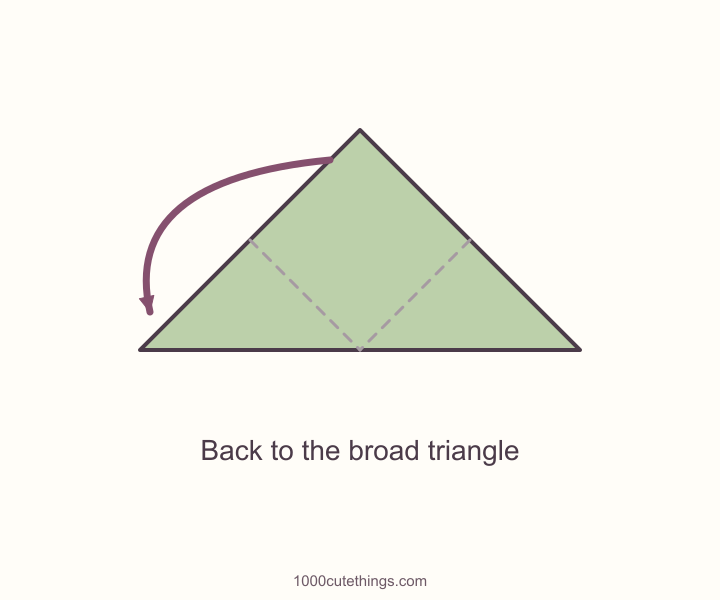
Step 6: Open the left guide fold. Open the left flap too. You have the broad triangle again, with two sloping guide creases. Do not unfold the long bottom edge.
Step 7 of 14
Find the front sheet
At the upper point, gently separate the two sheets. Keep the rear point standing. Hold only the point on the sheet facing you.
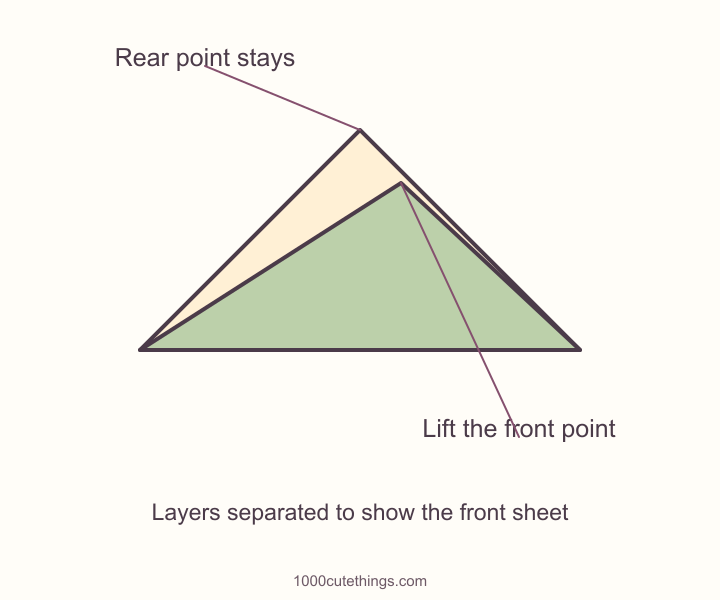
Step 7: Find the front sheet. At the upper point, gently separate the two sheets. Keep the rear point standing. Hold only the point on the sheet facing you.
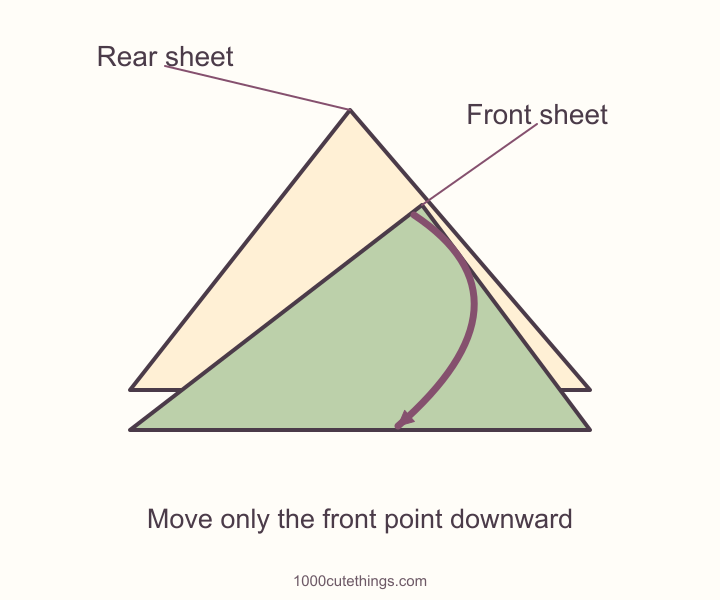
The rear point remains upright while the front sheet moves.
Step 8 of 14
Lower only the front point
Fold that front point down to the middle of the long bottom edge. Press the short horizontal fold. The rear point stays at the top; the cream folded flap makes the front of the pocket.
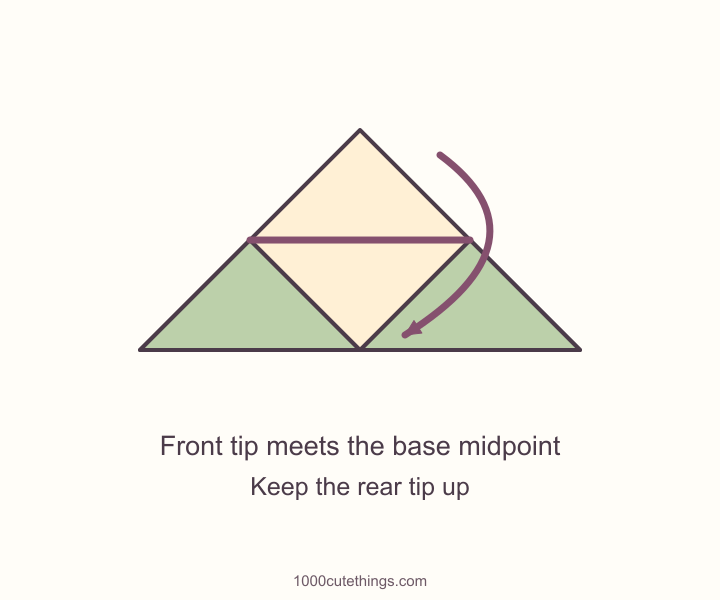
Step 8: Lower only the front point. Fold that front point down to the middle of the long bottom edge. Press the short horizontal fold. The rear point stays at the top; the cream folded flap makes the front of the pocket.
Step 9 of 14
Raise the left side again
Refold the left point to the top using its existing sloping crease. Leave the right side open for now. The upper part of this raised flap is the part to tuck.
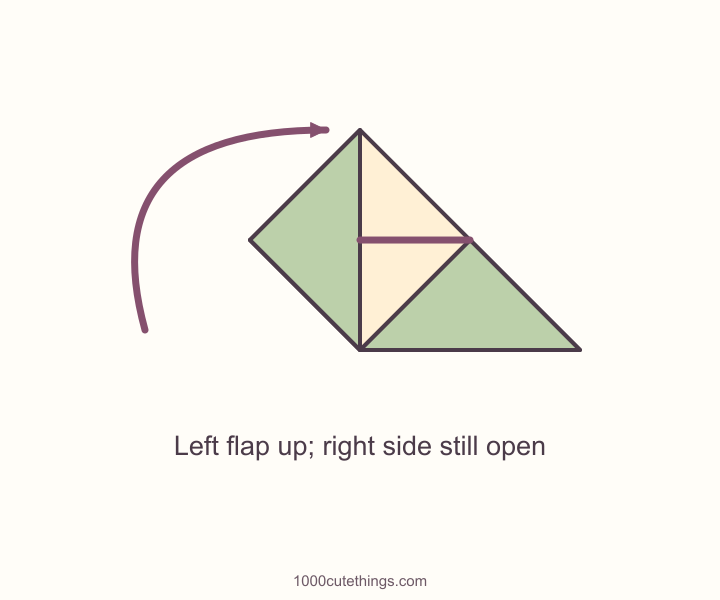
Step 9: Raise the left side again. Refold the left point to the top using its existing sloping crease. Leave the right side open for now. The upper part of this raised flap is the part to tuck.
Step 10 of 14
Tuck the left tip inside
Lift the horizontal pocket lip slightly. Bend the raised left tip downward and feed it behind the cream pocket flap, toward the bottom point. Press the side fold; do not push through the rear sheet.
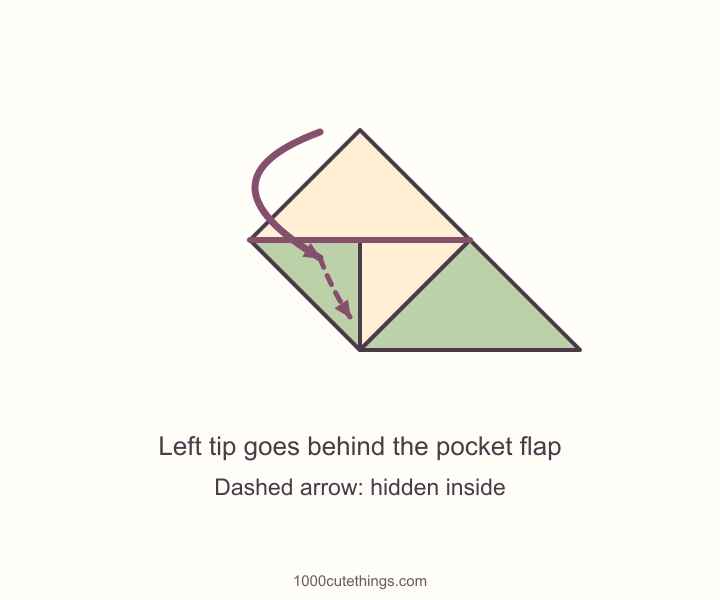
Step 10: Tuck the left tip inside. Lift the horizontal pocket lip slightly. Bend the raised left tip downward and feed it behind the cream pocket flap, toward the bottom point. Press the side fold; do not push through the rear sheet.
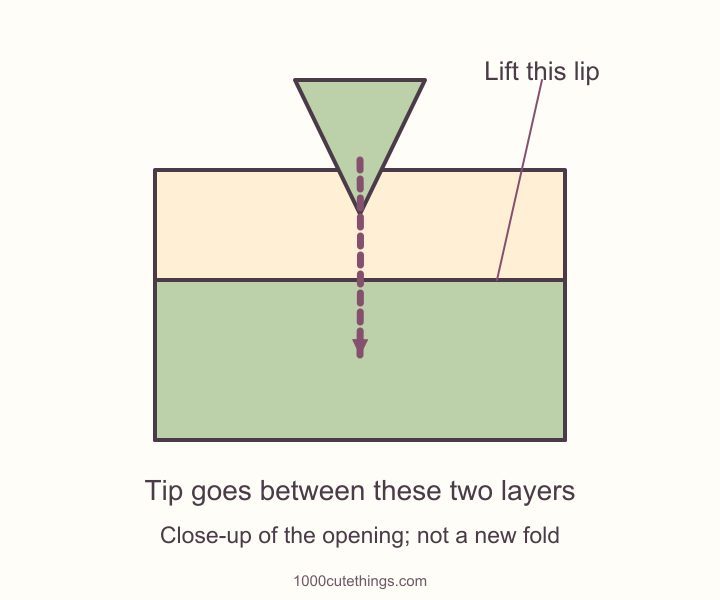
Lift the lip just enough to feed the tip inside. This close-up shows the opening, rather than another fold.
Step 11 of 14
Raise the right side
Refold the right point to the top along its guide crease. Keep the first tucked flap inside its pocket while moving this side.
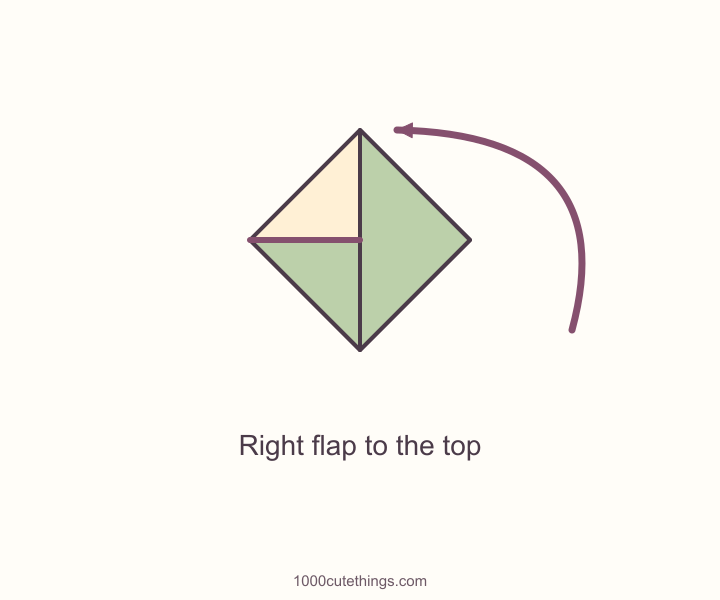
Step 11: Raise the right side. Refold the right point to the top along its guide crease. Keep the first tucked flap inside its pocket while moving this side.
Step 12 of 14
Tuck the right tip inside
Lift the same pocket lip and fold the right tip down into the remaining half of the pocket. Settle both flaps without pulling the first one out.
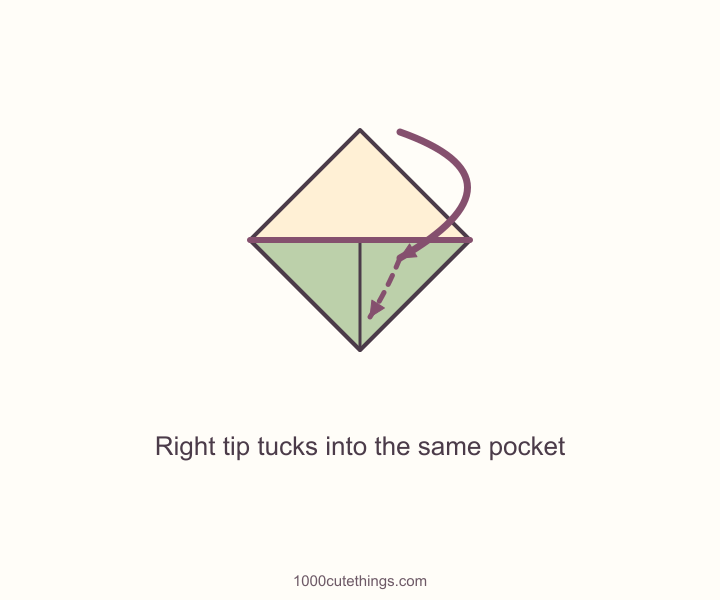
Step 12: Tuck the right tip inside. Lift the same pocket lip and fold the right tip down into the remaining half of the pocket. Settle both flaps without pulling the first one out.
Step 13 of 14
Flatten and find the opening
Press the sloping side folds and the center seam gently. Leave the straight pocket opening between the front triangle and the back square free to open. Both tips should be hidden inside.
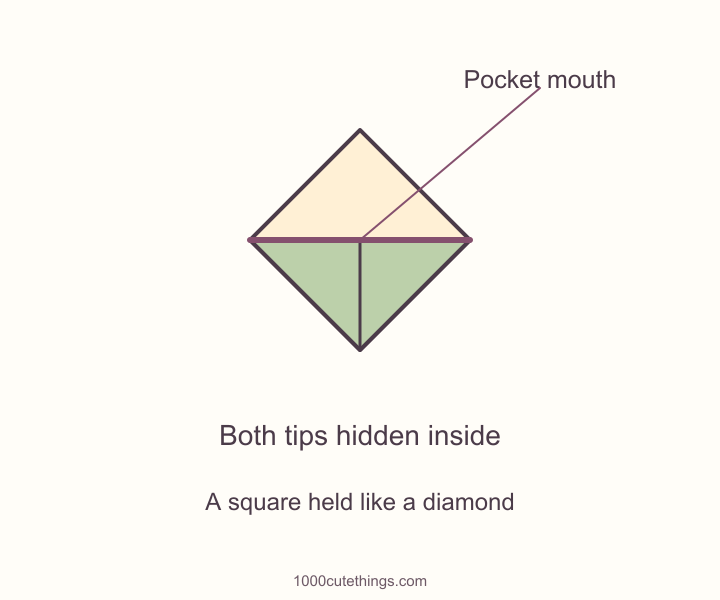
Step 13: Flatten and find the opening. Press the sloping side folds and the center seam gently. Leave the straight pocket opening between the front triangle and the back square free to open. Both tips should be hidden inside.
Step 14 of 14
Slide in one page corner
Rotate the bookmark to match the page corner. Guide that single corner through the mouth, behind the green front triangle. Ease it toward the closed corner, then stop when it sits comfortably.
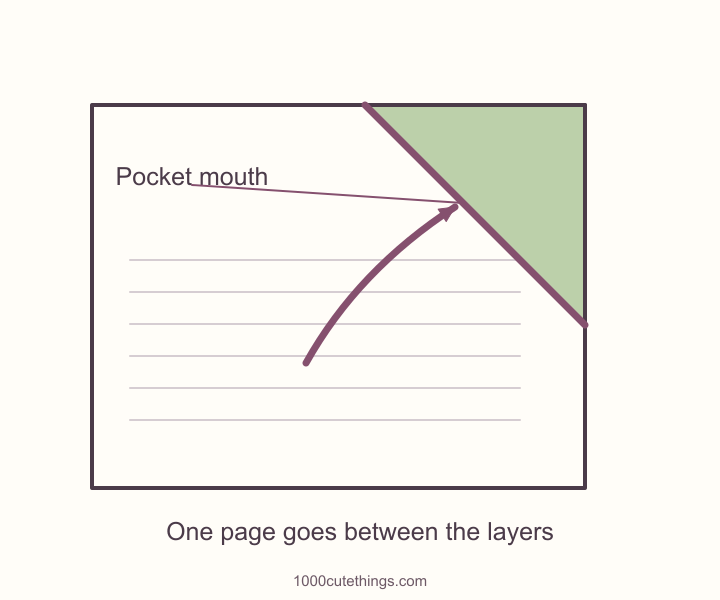
Step 14: Slide in one page corner. Rotate the bookmark to match the page corner. Guide that single corner through the mouth, behind the green front triangle. Ease it toward the closed corner, then stop when it sits comfortably.
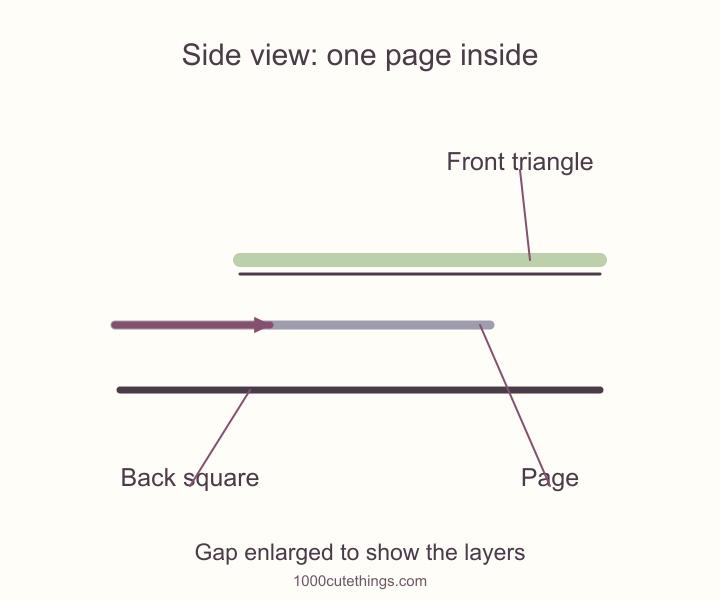
The gap is enlarged here to make the three layers visible.
Compare the real folds
Pause after step 8 and compare the left photo below. You should still see one rear triangle standing above a straight pocket lip. If both sheets have gone down, reopen that fold and separate them before continuing.
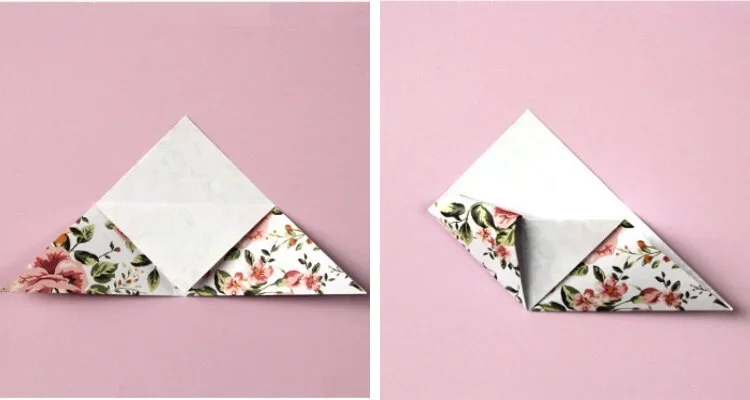
Left: the rear triangle stays upright while the front point folds down. Right: the raised side tip bends into the pocket, behind the folded front layer.
Folding photos: Emma, Gathering Beauty — full photo tutorial. The patterned face replaces the green face in our diagrams. Their sequence raises the right corner first; the pocket and front-layer fold are the same.
For steps 10 and 12, use the right photo to check where the tip goes. Lift the pocket lip slightly; the tip enters behind it. The tip should disappear inside, rather than sit on the front as another triangle. Tuck one side, settle it, then repeat with the other side through the same opening.
Before fitting the bookmark, look for three things: both tips hidden, the rear square intact, and the pocket mouth still free. If one tip comes out, ease that same side back in; do not glue across the opening. Use the layer view at step 14 to place one page between the front triangle and back square.
Make the tuck easier
The whole top point folds down. Reopen the last fold and find the two sheets again. Leave the rear sheet at the original top point. Lower only the sheet facing you. The exposed rear triangle should still be visible above the pocket lip.
A tip sits on top instead of inside. Raise it again rather than pressing harder. Find the straight lip across the middle and lift it slightly. The tip needs to go behind the folded front sheet. It should disappear between layers, not simply lie over the green front triangle.
The second tuck pulls out the first. Keep a fingertip lightly over the tucked side while you raise the other flap. Feed the second tip in gradually, then settle the two side folds. The guide shows the left side first; the right side uses the same opening.
The edges do not meet. Check that each guide fold actually brought a side corner to the top point. If the starting diagonal or one guide crease is off, adjust that crease before adding the tucks. Do not add an extra narrow fold just to disguise a mismatch.
The tip wrinkles or will not enter. Open the pocket a little more and ease the tip in from the opening. If the paper remains too bulky, unfold it and try a thinner square. The zero-thickness diagrams show where the layers belong; real paper takes up space and should not need to be forced flat.
Check the fit before decorating
Use one ordinary page for the first fitting. Open the book enough to reach a single corner, then orient the cap so its two closed edges follow the page edges. The back square goes behind the page. The green front triangle stays in front, with the diagonal opening facing toward the middle of the page.
Slide the corner between those layers and ease it toward the closed corner of the cap. Stop if the paper drags or buckles. Remove it by sliding it back along the same direction, rather than pulling a tucked flap outward.
Close the book gently and check that it rests comfortably. A page marker is not a clip for a thick group of sheets or a rigid cover. If the cap takes up too much of the page or covers something you want to read, start again with a smaller square.
Keep the first attempt plain while you check the opening. There is no need to glue the pocket shut: that would block the space the page needs. Thick stickers, raised decorations and loose glitter also add bulk between the pages. A small pen mark is an easier first variation.
Keep the finish flat
A plain paper cap is enough. For a small variation, draw a four-petal flower on the front triangle after folding. Let any pen marks dry before using it, and keep the pocket mouth clear.
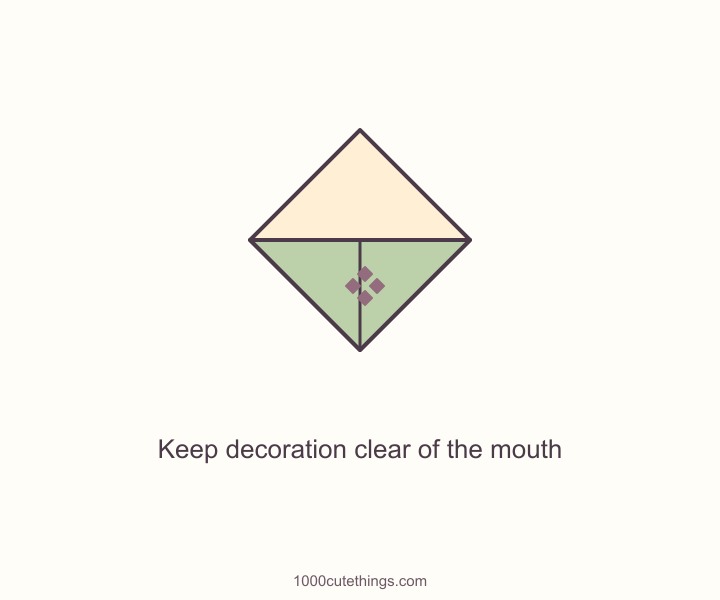
A tiny pen decoration keeps the surface flat and leaves the opening clear.
Print the folding guide
Keep the 14-step sequence beside your paper. Each pack has five pages: four pages of folding panels, then the front-layer, tuck and page-fitting reminders. The pictures explain the folds; they are not a cutting template.
PDFs open in a new tab. Fit-to-page is fine; start with your own measured square of paper.
Try another paper project
For a different kind of page marker, the pressed-flower bookmark guide uses a flat botanical strip rather than a folded corner pocket. If you want to practise another folded shape, the paper-crane garland takes a square through a longer sequence before hanging the finished cranes.
A small folded bookmark can also accompany a fabric-wrapped book. Keep the finished cap separate while wrapping, then place it on one page when the gift is opened.
For alternative folding demonstrations, see the National Literacy Trust’s bookmark activity, Gathering Beauty’s corner-pocket tutorial and Carolina Buchting’s folding and page-use sequence. Their starting orientation or paper size may differ; keep one orientation consistent while following this guide.